PNG to PDF
Convert your PNG images to a single PDF file.
Drag & drop your PNG images here
or click to choose from your device
How to convert PNG to PDF
- Add your PNGs — drag them in, click Choose Files, or paste a screenshot straight from the clipboard with Ctrl+V.
- Drag the thumbnails into the order you want, or use Sort By to arrange them by name or size.
- Set the page size, orientation, margins and how each image should sit on its page.
- Leave Maintain image quality ticked if any of your PNGs have transparent areas.
- Click Generate PDF, then rename and download the finished file.
Want a more detailed walkthrough? Read the full step-by-step guide →
PNG to PDF online — free, fast and private
Turn PNG images into a PDF. With Pixpoo you can convert PNG to PDF online for free, right in your browser — no sign-up, no watermark, and your files are processed locally rather than sent to Pixpoo’s servers.
About PNG to PDF
PNG to PDF gathers a set of PNG images and writes them into one document, one image per page. Because PNG is the format screenshots, logos, diagrams and exported charts arrive in, this is usually less about photographs and more about turning a folder of captures into something you can send, print or file as a single piece.
The thing that makes PNG different from other image formats is the alpha channel — the transparency that lets a logo sit on any background without a white box around it. Pixpoo carries that alpha channel through into the PDF rather than flattening it away, so a transparent PNG stays transparent on the page. One setting can undo that, and it is called out clearly below.
Images are added losslessly. A PNG is decoded and re-stored using the PDF format’s own lossless compression, which means the pixels that come out are the pixels that went in — nothing is re-compressed, and fine detail like one-pixel rules in a screenshot or the edge of a UI element survives intact.
When is PNG the format you are converting from?
PNG is what you get when the source is a screen rather than a camera, and those are the jobs this tool is shaped around.
- Turning a run of screenshots into a single walkthrough, bug report or training document.
- Collecting exported charts, dashboards or design mockups into one file for review.
- Filing proof of payment, booking confirmations or chat records captured from a phone or laptop.
- Assembling logo variants, icon sheets or brand assets into a document a client can flip through.
- Submitting scanned or photographed forms that were saved as PNG, where a portal only accepts PDF.
PNG to PDF options explained
The settings panel decides what each page looks like; the toolbar above the thumbnails decides what order the pages come in. The first card below is the one that matters most for PNG.
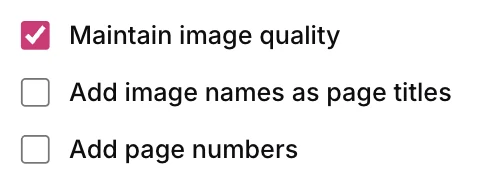
Maintain image quality
Ticked, your PNG is placed into the PDF as a PNG — stored with lossless compression and with its alpha channel intact, so transparent and semi-transparent areas stay that way. Untick it and each image is redrawn onto a white background, converted to JPEG and capped at 2000 pixels on its longest side. That makes a much smaller file, but transparency is gone permanently and a half-opaque area comes out solid.
Leave it ticked whenever transparency matters or the images are screenshots, because JPEG compression is at its ugliest around small text and hard edges. Untick it only when the PDF is too large to send and the images are photographic — and check the result, because the change cannot be reversed. The two boxes below it add the image filename above each page and a page number at the foot; filenames are drawn in a basic font, so anything outside plain ASCII, accented letters included, appears as a question mark.

Image Fit
How each image is placed inside the margins. Fit to page scales it until the whole image is visible, keeping its proportions. Fill crops the overflow to cover the page. Actual size places it at its natural dimensions, and Stretch forces it to the full area regardless of shape.
Fit to page is right for almost every PNG, and especially for screenshots and diagrams, where cropping or distorting loses the point. Fill suits a full-bleed background image. Actual size is worth knowing when an icon or logo would otherwise be blown up to fill an A4 page — a 200-pixel logo scaled to fit will look soft, whereas at actual size it stays sharp and simply sits small on the page.

Sorting and arranging
Sort By reorders every image at once — by filename or size — while dragging a thumbnail switches the list back to Custom Order. The arrows nudge a selected image one place up or down. Blank Before and Blank After insert an empty white page, and Delete removes what is selected. Undo and redo above the toolbar cover all of it.
Sorting by name is the quickest way to fix a batch of screenshots, provided they were saved with numbers that sort correctly — screenshot-2 and screenshot-10 will not, unless the numbers are padded. Blank pages are useful as section dividers, or to force a pair of images onto facing pages when the document will be printed double-sided.
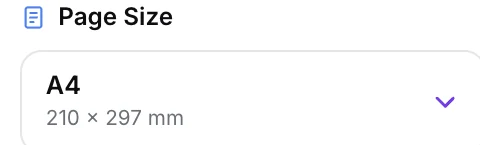
Page Size
The paper size each image is placed on, with the usual options and a Fit to image setting that makes every page exactly the size of the image it holds, with no margins and no empty space.
A standard size when the document will be printed or filed alongside other paperwork. Fit to image when it will only ever be read on screen — a set of phone screenshots on A4 leaves tall white bands above and below each one, while Fit to image gives a document shaped like the screenshots themselves. Note that Fit to image ignores the orientation setting, since each page simply takes the image’s own shape.
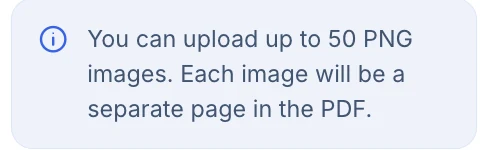
The 50-image limit
This tool accepts up to 50 images in one document, and each becomes a page. Adding more than that keeps the first 50 and tells you the rest were not used, rather than failing.
Fifty covers most screenshot sets. For more, convert in batches and join the results with Merge PDF — which is often better anyway, because 50 lossless PNGs already make a large file and a few hundred would make an unwieldy one.
Why use Pixpoo for PNG to PDF?
- Transparency survives. Partial alpha is carried through too, so a soft shadow or a 50 per cent overlay lands on the page the way it looked in the file.
- PNG pixels are stored losslessly, so screenshots stay crisp instead of picking up the fringing that lossy compression leaves around text and thin lines.
- Images can be reordered by dragging, sorted by name or size, and blank pages can be inserted between them for separators or notes.
- Undo and redo cover the whole arrangement, so a mistaken sort or delete is one click back rather than a fresh start.
- Screenshots can be pasted straight in with Ctrl+V without saving them to disk first.
- Everything happens in your browser — the images are not sent to Pixpoo’s servers.
PNG to PDF features
PNG to PDF limitations
Transparency survives only while Maintain image quality is ticked. Unticking it redraws every image onto a white background as a JPEG and limits it to 2000 pixels on the long edge, which cannot be undone once the file is generated. Because lossless storage keeps every pixel, a document built from full-resolution screenshots can be large: the PDF tends to sit close to the combined size of the source PNGs, with a little structural overhead on top that matters more when the images are small. The tool takes at most 50 images at a time, and files beyond that are dropped with a notice rather than converted. Images are routed by file extension rather than by inspecting their contents, so a PNG misnamed .jpg fails outright, while one misnamed .webp is quietly redrawn as a JPEG and loses both its transparency and its lossless storage. Page titles are drawn using a standard font, so characters outside basic ASCII — including accented Latin characters such as é and ü — are replaced with question marks. And because the pages are images, no text inside them is searchable in the finished PDF; run the result through OCR PDF if you need the words to be findable.
Common PNG to PDF questions
Is PNG transparency kept in the PDF?
Yes, as long as Maintain image quality is ticked. The image is embedded with its alpha channel intact, so fully transparent areas stay clear and partly transparent areas keep their exact opacity — we checked a 50 per cent overlay and it arrives at 50 per cent. Untick that box and every image is flattened onto white first, which removes transparency for good.
Does converting reduce the quality of my PNGs?
No, not with the default settings. The image is stored using lossless compression, so the pixels in the PDF are identical to the pixels in your file — nothing is re-encoded and no detail is thrown away. That is what keeps screenshots readable at small sizes.
Why is my PDF so large?
Because nothing is being compressed away. The PNG image data is stored losslessly, so the PDF can remain close to the combined size of the source PNGs, especially for large images — and PNG screenshots are not small. If the file needs to be lighter, run it through Compress PDF afterwards, or untick Maintain image quality — bearing in mind that the second option converts everything to JPEG and discards transparency.
How many PNGs can I convert at once?
Up to 50 in a single document. If you add more, the first 50 are kept and you are told the rest were not used. For a longer set, convert in batches and combine them with Merge PDF.
Can I paste a screenshot instead of saving it first?
Yes. Copy a screenshot to your clipboard and press Ctrl+V anywhere on the page, and it is added as a page. It is the fastest route for a document built from screen captures, because nothing has to be written to disk in between.
My screenshots came out in the wrong order — what happened?
Sorting by filename is alphabetical, so shot-10 sorts before shot-2 unless the numbers are zero-padded. Either rename the files with padded numbers, or drag the thumbnails into place by hand, which switches the list to Custom Order and leaves your arrangement alone.
Why does my small logo look blurry on the page?
Because Fit to page scales an image up to fill the available area, and a small PNG stretched across A4 has to invent pixels it does not have. Choose Actual size instead and it will be placed at its true dimensions — small on the page, but perfectly sharp — or use Fit to image as the page size so the page matches the logo.
Is the PNG to PDF tool free?
Yes. PNG to PDF with Pixpoo is completely free — no sign-up, no watermark, no usage limits and no paid plan. It runs entirely in your browser, so there is nothing for us to meter.
Are my files uploaded to a server?
No. When you use PNG to PDF, your files are processed in your browser and are not sent to Pixpoo’s servers — Pixpoo does not upload or store them.
Related tools: PDF to Word, JPG to PDF, PDF to JPG, Word to PDF. All PDF tools →