Compress Image
Make a picture smaller without making it
look worse. You choose how far to go.
7 easy ways to add an image
Add an image from anywhere. Fast, simple and flexible.
- 1Drag & dropDrop your image right here
- 2Choose from deviceBrowse your computer
- 3Copy & pasteCopy an image from a webpage or screenshot and paste it here
- 4Google DriveImport from Google Drive
- 5DropboxImport from Dropbox
- 6From LinkPaste an image link (URL)
- 7Scan QR CodeUpload from your mobile
How to compress an image online
- Add the picture you want to make smaller. It is read in your browser first, so the preview and its dimensions appear before anything is sent.
- Choose a compression level — Medium is already selected — or name a target file size instead.
- Check the estimated result, then press Compress Image.
- Download the lighter file, or hand it straight to another tool from the buttons underneath.
Want a more detailed walkthrough? Read the full step-by-step guide →
Compress an image online — free, fast and no watermark
Free online image compressor — shrink JPG, PNG, WebP and AVIF file sizes by up to 90% with barely any visible quality loss. Compress a photo to 100 KB or any size you name, choose lossless for logos and screenshots, and keep the original dimensions. No sign-up, no watermark.
How your image is processedYour image is uploaded to our server once for processing. It is held temporarily in memory only for the duration of the operation and is not permanently stored. The processed file is then returned to your browser. Our PDF tools work differently: those run entirely in your browser and upload nothing.
About Compress
Compression changes how the existing pixels are encoded; it leaves the image dimensions untouched. That is what separates it from resizing, which reduces the pixel count itself, and from cropping, which discards part of the frame. A compressed photo is the same photo at the same size — it simply weighs less, and the download reports the same width and height it went in with.
The saving comes from discarding detail your eye was never going to register: fine gradations of colour, texture in shadow, differences between neighbouring pixels that no screen resolves. How much you can discard before it starts to show is the whole question, and it is what the four compression levels are for.
Most images arrive far heavier than they need to be. A camera writes for an editing suite, not for a web page, and phones write for a screen you will never print. Somewhere between the file you have and one a tenth the size is the point where the picture stops looking the same — the job here is to stop just short of it.
One thing this tool deliberately does not do is change the file type. The compressed image comes back in the format it arrived as, so a JPEG stays a JPEG and a PNG stays a PNG. Converting is often the larger saving, but it is a different decision with different consequences, so it lives in Convert Image rather than being applied quietly here.
When compressing is the right fix
Whenever the picture is already the right size and shape, and only the weight is wrong.
- Photographs slowing a web page down, where the layout already fits them.
- Email attachments bouncing off a mailbox size limit.
- An upload form that states a maximum file size in kilobytes.
- A folder of camera files being archived, where a fifth of the size is worth a little detail.
- Product images on a store page, where every extra megabyte is a slower first impression.
Compress options explained
There are only four things to decide here, and the screen opens with sensible answers to all of them: Medium level, no size ceiling, lossy, metadata stripped. Change a setting and the estimated result underneath updates before you commit to anything. The compressed file always comes back in the format it arrived as.

Compression level
Four presets that set the encoder quality for you: Low 90, Medium 75, High 55 and Maximum 35. Medium is selected when the screen opens, so pressing the button without touching anything gives you the balanced setting rather than an unstated one.
Medium is the honest default for photographs on a web page. On a 3000×2000 test image saved as JPEG at quality 92, weighing 1.27 MB, the four levels returned 1.08 MB, 310 KB, 126 KB and 55 KB — 15% off at the top of the range and 96% off at the bottom. Your own numbers will differ, because how much a picture gives up depends entirely on how hard it was squeezed before it reached us. High is where artefacts begin showing on skin and smooth sky while staying invisible on busy detail; Maximum is for thumbnails and previews, where the picture is too small for anyone to look closely. Low is the one to be careful with: on a file that has already been compressed once, asking for quality 90 usually costs more bytes than it saves.

Target file size
A ceiling instead of a quality guess. Pick 50, 100, 200 or 500 KB, or choose Custom and type your own figure in either kilobytes or megabytes. The server then encodes the picture several times over, narrowing in on the quality setting, and returns the largest result that still comes in beneath the number you named. Auto — the default — means no ceiling: the level you picked is used directly.
The right control whenever a form states a limit, because it removes the guesswork entirely. On our test image it landed at 493 KB, 193 KB, 95 KB and 48 KB against requests of 500, 200, 100 and 50 KB, choosing quality 83, 67, 51 and 32 respectively. Two things to know about where it runs out of room. It searches only formats with a real quality dial — JPEG, WebP, AVIF and TIFF — so a PNG or GIF paired with a ceiling gets the level you picked and nothing more. And no search can go below what quality 1 produces, so on a very large photograph the floor may sit above a tight target; the answer then is fewer pixels rather than less quality, which means running it through Resize Image first.

Custom target size
Choosing Custom reveals a number box and a KB / MB switch, so a limit stated in megabytes does not have to be converted in your head first.
Whenever the number you have been given is not one of the four presets. A 2 MB mailbox limit, a 350 KB marketplace rule, a 1.5 MB upload cap — type the figure, pick the unit, and the same search runs against it.

Compression type
Lossy discards detail to save bytes. Lossless keeps the pixels exactly as they arrived and saves only what can be saved without altering them. Lossless is offered for WebP, PNG and AVIF — the formats that have a lossless mode.
Lossy for anything photographic. Lossless for a logo, a screenshot, a chart or a diagram, where a soft edge or a smeared line is obvious in a way it never is on a photograph. It is not a small difference in weight: on a 1000×1000 crop, WebP went from 54 KB lossy to 967 KB lossless, and PNG from 296 KB to 1.74 MB. We checked that the promise holds rather than assuming it, decoding the output and comparing it against the source sample by sample — lossless WebP, PNG and AVIF all came back identical, every channel of every pixel. Note that a size ceiling and lossless cannot both apply, since lossless leaves nothing to trade; choosing it greys the target row out and says so.

When lossless is not available
JPEG, GIF and TIFF have no lossless mode, and since the output format follows the input, uploading one of those leaves the lossless card disabled with a line explaining why.
Nothing to do here except know what it means: if you need a lossless copy of a JPEG, the format has to change first, and that is Convert Image’s job. Converting a JPEG to lossless WebP preserves the JPEG’s pixels exactly — but those pixels already carry whatever the original JPEG encode threw away, so it locks in the current state rather than recovering anything.

Estimated result
A projection of what you are about to get, updating as you change the level or the ceiling. It is arithmetic, not a trial encode — running the real thing on every click would mean a round trip to the server each time — so treat it as the shape of the answer rather than the answer. The figure on the download screen afterwards is the real one.
Read it before pressing the button, particularly when it disagrees with what you expected. It is deliberately cautious about files that have already been compressed: re-saving at the same format cannot repeat a saving that has already been taken, and the estimate now accounts for that instead of promising a reduction the encoder cannot deliver.
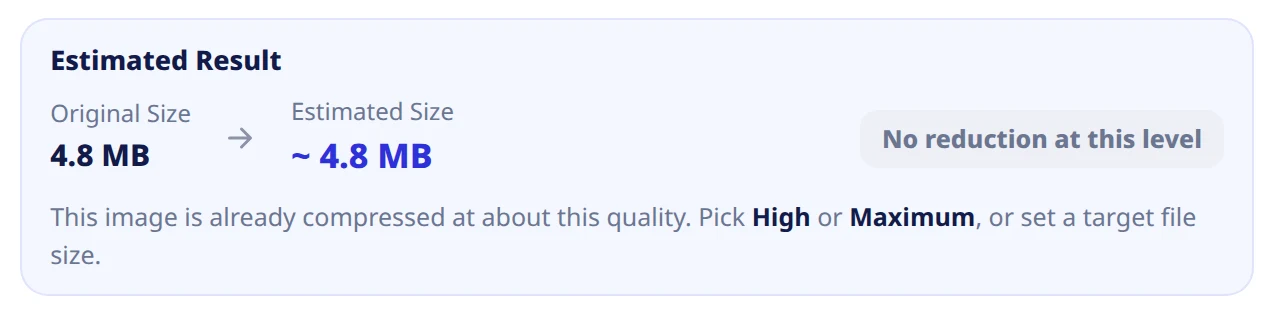
When there is nothing left to save
If the chosen level would not actually make the file smaller, the panel says so in words instead of showing a cheerful percentage, and points at the settings that would.
This is the normal state of affairs for a file that has been compressed once already, and it is worth understanding rather than working around. Taking our test image down to quality 55 and then feeding it back in, Low came out 48% larger, Medium 21% larger and High identical; only Maximum saved anything. The server will not hand back a file bigger than the one you gave it — if the re-encode comes out heavier, you get your original bytes back unchanged — but a level that produces no saving is still a wasted press, and the panel is there to spare you it.

More options
Remove EXIF metadata strips the camera, date and location tags your photo arrived with. It is ticked by default, which matches what the file actually gets — untick it to keep them.
Leave it ticked unless you specifically need the camera settings or the date to travel with the picture, and certainly leave it ticked for anything going somewhere public: a photograph straight off a phone carries the coordinates it was taken at. Losing the block also trims the file a little — roughly 800 bytes on a test shot carrying make, model and four location tags.
Why use Pixpoo for Compress?
- Four one-click levels, with the balanced one already selected when the screen opens.
- A file-size ceiling that finds its own quality setting when a form states a limit.
- An estimated result before you commit, and a plain warning when there is nothing left to save.
- Genuinely lossless WebP, PNG and AVIF for artwork that must not lose a single pixel.
- Camera and location data stripped by default, which also trims the file a little.
- Never returns a file bigger than the one you gave it.
Compress features
Compress limitations
Where the honest edges are. Compression cannot make a picture better — every lossy setting throws something away, and a file already squeezed once has less left to give, so repeatedly compressing the same image degrades it a step at a time. Take each new version from the original instead. The output format always matches the input, so this tool cannot turn a JPEG into a WebP; use Convert Image for that, and expect a larger saving from the format change than from the quality setting. Lossless is offered only for WebP, PNG and AVIF, because JPEG, GIF and TIFF have no lossless mode. The size ceiling is searchable on four formats only — JPEG, WebP, AVIF and TIFF — and no search can go below whatever quality 1 produces, so on a large photograph the floor may sit above a tight target and the answer becomes fewer pixels. PNG responds to the quality setting very unevenly, because what it spends its bytes on is the number of colours it keeps rather than a fidelity dial; on some images the level buttons barely separate at all. Dimensions are never changed here — use Resize Image when the picture is simply larger than the space it sits in. An animated GIF is flattened to one frame. Pictures go through one at a time. The upload ceiling is 25 MB, and iPhone HEIC files are refused. Compression happens on a server, so the file does travel — the privacy question below sets out exactly what happens to it.
Common Compress questions
How do I compress an image without losing quality?
For a photograph, aim for invisible loss rather than none: Medium is where most people stop being able to tell. If you truly need every pixel intact, and your file is a WebP, PNG or AVIF, switch Compression type to Lossless — we decoded the output and compared it against the source sample by sample, and it came back identical. It costs a lot of weight, though: a 54 KB lossy WebP became 967 KB lossless on our test crop. That trade is worth it for a logo or a screenshot and rarely worth it for a photograph. A JPEG cannot be compressed losslessly, because the format has no lossless mode.
How much smaller will my image get?
It depends far more on how compressed the file already is than on the picture. On a 3000×2000 test image written as JPEG at quality 92 and weighing 1.27 MB, the four levels returned 1.08 MB, 310 KB, 126 KB and 55 KB — about 15% off at Low and 96% off at Maximum. Feed a file that has already been squeezed hard back in and the numbers collapse: the same image taken down to quality 55 first gave nothing back at Low, Medium or High, and only 26% at Maximum. The estimated result panel tells you which of those situations you are in before you press anything.
How do I compress an image to a specific size like 100 KB?
Use Target file size rather than guessing at a level. Pick 50, 100, 200 or 500 KB, or choose Custom and type your own figure in KB or MB, and the server encodes repeatedly and keeps the largest version that fits underneath. On our test image a 100 KB request came back at 95 KB, at quality 51. Whether it can reach a tight number depends on the pixel count — no setting can go below what quality 1 produces — so when the floor sits above your target, reduce the dimensions first with Resize Image and then compress.
What is the difference between lossy and lossless compression?
Lossy compression permanently discards detail it judges you will not miss, which is how a photograph can lose four-fifths of its weight and still look right. Lossless compression only reorganises the data, so the picture that comes back decodes to exactly the same pixels — nothing is discarded, and the saving is far smaller or even negative. Photographs suit lossy; logos, screenshots, charts and line art suit lossless, because a smudged edge there is obvious in a way it never is on a photograph.
Can I change the file format while compressing?
Not here — the compressed file comes back as whatever it arrived as. That is deliberate: changing format is usually a bigger saving than changing quality, but it also changes what the file can do, so it is a decision worth making on its own rather than as a side effect. Convert Image handles it, and the finished screen here hands your compressed image straight to it if you want both.
Does compressing an image remove EXIF and GPS data?
Yes, by default — the Remove EXIF metadata box is ticked when the screen opens, and a test shot that arrived with its camera make, its model and four location tags came back holding none of them. Removing them also trims the file a little, about 800 bytes on that test. Untick it if you need the camera settings or the date to travel with the picture, and leave it alone if you are publishing the photo anywhere public.
Does compressing reduce the image dimensions?
No. Compression changes only how the existing pixels are encoded, so the picture comes back at exactly the width and height it went in at, and the download screen shows those numbers. If you want smaller dimensions as well, use Resize Image — reducing dimensions is usually the bigger saving of the two when an image is far larger than the space it is displayed in, and the finished screen here links straight to it.
Why did my image not get any smaller?
Almost always because it had already been compressed before you uploaded it, and the easy savings were taken the first time. Asking for a gentle level on such a file can even cost bytes rather than save them — on our test, a file already at quality 55 came back 48% larger at Low and 21% larger at Medium. Two things protect you from that. The estimated result panel says No reduction at this level before you press, and the server refuses to hand back a file bigger than the one you gave it, returning your original bytes instead. The fix is a harder level, a target file size, or fewer pixels.
Can I compress the same image twice?
You can, but it is the wrong habit. Each lossy pass works on what the previous one left, so the damage accumulates and the second pass saves far less than the first — often nothing at all. If you want a lighter version than the one you have, go back to the original and compress it once, harder.
Does it work on a phone?
Yes. The tool runs in any modern browser on Android and iOS with nothing to install, and you can compress an image straight from your camera roll.
Is the Compress tool free?
Yes. Compress with Pixpoo is completely free — no sign-up, no watermark and no usage limits on the free tier.
Are my images uploaded to a server?
Yes. Image Toolkit operations upload the selected image to our server for processing. The file is held temporarily in memory, used only to perform the requested operation, and then discarded. Images are not permanently stored, never written to disk and never shared. Our PDF tools work differently: those run entirely in your browser and upload nothing, so a PDF stays on your device throughout.
Related image tools
Resize · Crop · Convert · Upscale · All image tools