Resize Image
Change image dimensions quickly and easily.
Keep the right size for your needs.
7 easy ways to add an image
Add an image from anywhere. Fast, simple and flexible.
- 1Drag & dropDrop your image right here
- 2Choose from deviceBrowse your computer
- 3Copy & pasteCopy an image from a webpage or screenshot and paste it here
- 4Google DriveImport from Google Drive
- 5DropboxImport from Dropbox
- 6From LinkPaste an image link (URL)
- 7Scan QR CodeUpload from your mobile
How to resize an image online
- Add your image — drag and drop it, or click to browse.
- Wait a moment while it loads: the progress ring reports the file being read, then uploaded.
- Choose Custom Size, Preset Sizes or Percentage, and set the size you want.
- Open Advanced options if you need a format, a quality, a file-size limit or a DPI.
- Press Resize Image, then download the result.
Want a more detailed walkthrough? Read the full step-by-step guide →
Resize an image online — free, fast and no watermark
Free online image resizer — resize any JPG, PNG or WebP to exact pixel dimensions. Scale photos for social media, thumbnails, product listings or upload limits while preserving quality. No sign-up, no watermark, nothing stored.
How your image is processedYour image is uploaded to our server once for processing. It is held temporarily in memory only for the duration of the operation and is not permanently stored. The processed file is then returned to your browser. Our PDF tools work differently: those run entirely in your browser and upload nothing.
About Resize
Resizing changes how many pixels an image is made of. That is a different thing from compressing it, which keeps the pixel count and spends fewer bytes describing them — and different again from cropping, which throws away part of the picture. Resizing keeps the whole frame and redraws it at a new size.
Most of the time you are resizing because something at the other end has a rule: an upload form that caps dimensions, a social platform with a fixed canvas, a page that loads slowly because a 4000-pixel photo is being squeezed into a 600-pixel slot. The tool gives you three ways to say what you want — exact pixels, a ready-made preset or a percentage of the original — and, under Advanced options, control over the format, the quality and the size of what comes back.
A resize is a one-way change to the copy you download: the pixels taken out are not recoverable from it, and scaling that copy back up later will only produce a softer version. Your original file is untouched — the tool always hands back a new image — so keep it if there is any chance you will need a larger size again.
When resizing is the right fix
Almost always because something downstream has a constraint the original does not meet.
- A profile picture or product photo that has to be an exact pixel size.
- A social post that needs the platform’s canvas — a square, a story, a cover banner.
- Photographs straight off a camera or phone that are far larger than the page showing them.
- An upload form that rejects anything above a set width, height or file size.
- Several sizes of one picture — a thumbnail, a card image and a hero — made one after another from the same original.
Resize options explained
Three tabs across the top decide what the width and height mean, and everything about the file itself — format, quality, size limit, metadata — sits under Advanced options below them.

Custom Size, Preset Sizes and Percentage
Three ways of saying what size you want. Custom Size takes a width and a height in pixels and opens selected. Preset Sizes fills those numbers in from a ready-made list. Percentage scales the original by a factor instead of naming pixels.
Custom Size when you know the numbers, Preset Sizes when you are posting somewhere, Percentage when the target is relative — "half of whatever this is". Switching tab resets the size mode, so pick the tab first and adjust inside it.
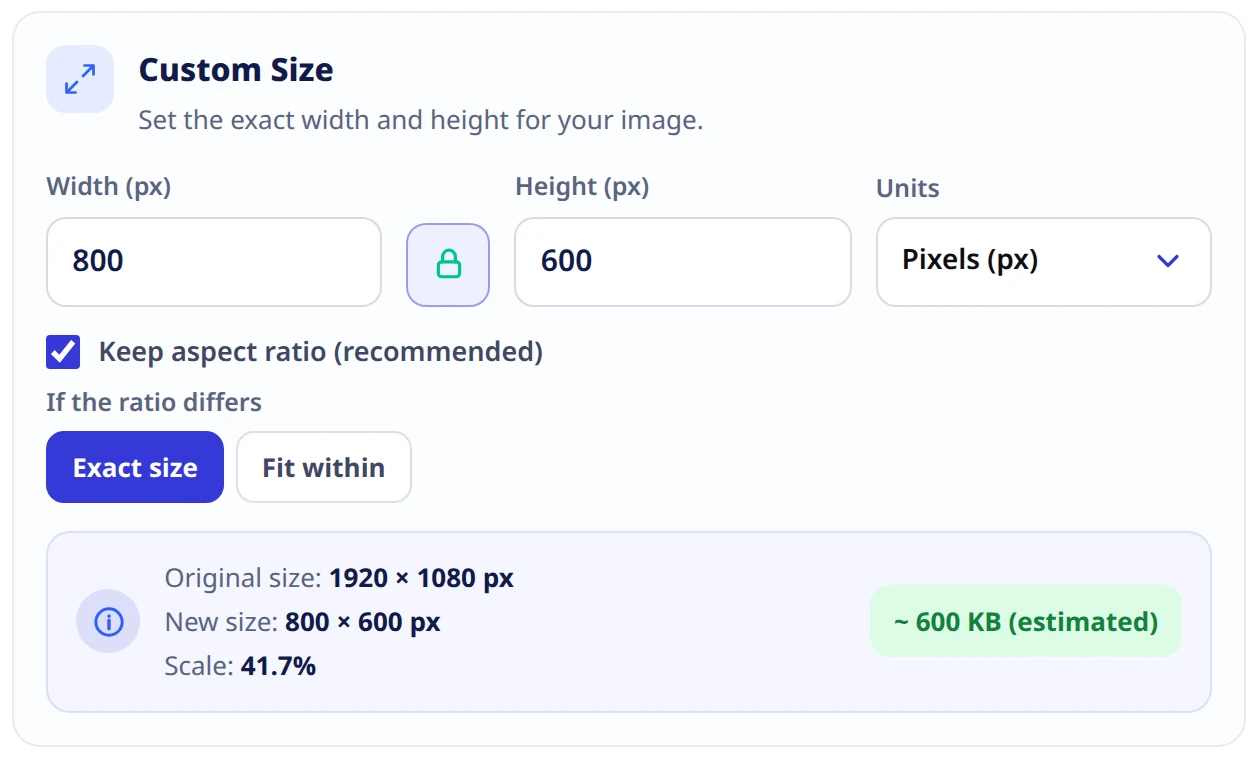
Width, height and the aspect lock
The target size in pixels. With Keep aspect ratio ticked, typing in one box recalculates the other from the original proportions. Units switches the two boxes between pixels and percent. Underneath, a strip reports the original size, the size you have asked for and the scale between them, with an estimate of the file that will come back.
Leave the lock on unless you mean to distort. The strip is the quickest way to sanity-check a number before you commit — if the scale reads over 100% you are enlarging, and enlarging never adds detail. The estimate is derived from the pixel count and the quality, so treat it as a guide; the real figure is on the download screen.
Exact size or Fit within
What happens when your numbers have a different shape to the picture. Exact size fills the box you named, whatever that does to the proportions. Fit within treats the numbers as a ceiling and scales the image down until it sits inside them, keeping its shape.
Fit within whenever you have a limit rather than a target — "no bigger than 1200 on the long side". Exact size when the frame matters more than the proportions, such as a platform canvas. With Keep aspect ratio ticked the two behave the same, because the numbers already share the original shape; the choice starts to matter the moment you unlock it or take a preset with a different ratio.
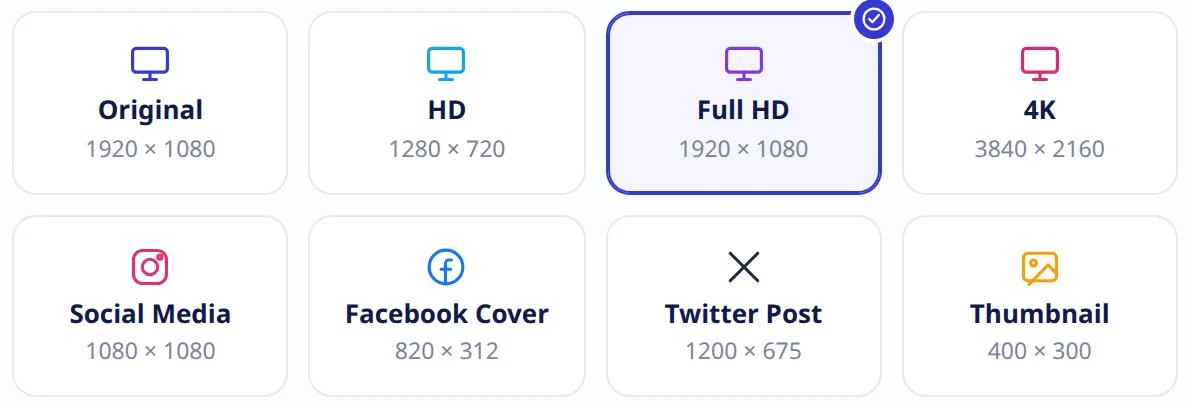
Preset sizes
Eight one-tap sizes that fill in the width and height for you: Original (whatever the file already is), HD 1280×720, Full HD 1920×1080, 4K 3840×2160, Social Media 1080×1080, Facebook Cover 820×312, Twitter Post 1200×675 and Thumbnail 400×300. A Custom Size block underneath lets you adjust the numbers a preset put there.
Whenever you are filling a known frame rather than meeting your own spec. They set the numbers only — the Exact size or Fit within choice still decides what happens to the shape. A preset with a different ratio to your photo will square it off under Exact size; pick Fit within instead if you would rather the whole picture were scaled to sit inside the frame. If the platform crops rather than scales, use the crop tool first and resize afterwards.
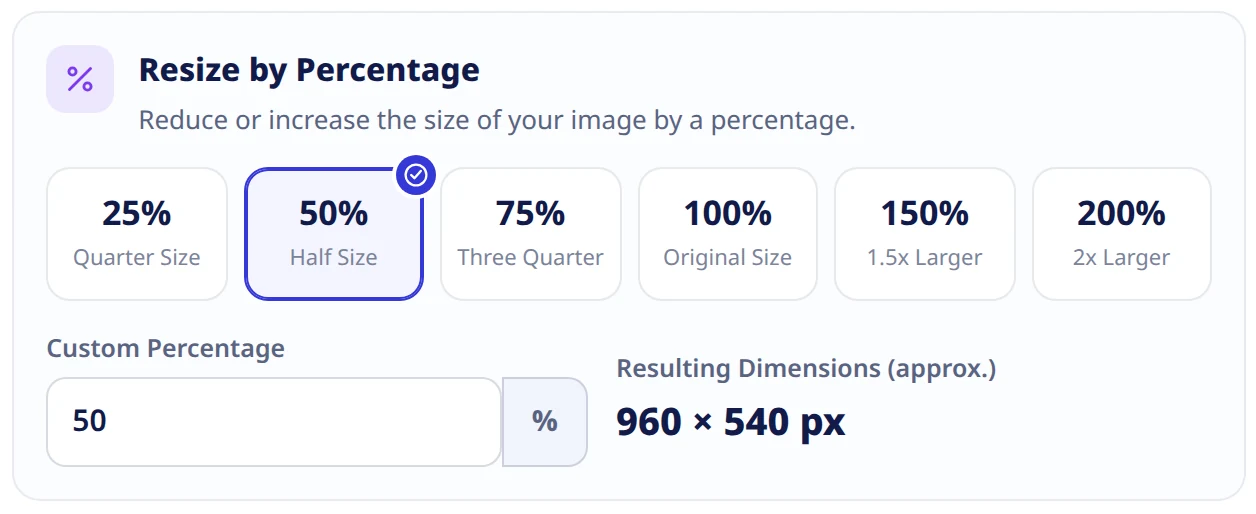
Percentage
Scales the original by a factor rather than a pixel size. Six tiles — quarter, half, three quarter, original, 1.5× and 2× — plus a box for any figure from 1 to 400. The resulting pixel dimensions are shown as you change it.
Good for batches of mixed sizes, where "half" means something and "1200 wide" does not. Anything over 100% is an enlargement: the picture gets bigger but no sharper, so use the upscaler if you need real detail added.

Advanced: output format and quality
Six formats — WebP, JPEG, PNG, AVIF, GIF and TIFF — and a quality slider that defaults to 82. It drives JPEG, WebP, AVIF and TIFF in the way you would expect. GIF ignores it: we encoded the same picture at every setting from 1 to 100 and got byte-identical files. PNG responds, but differently — the slider controls how few colours the palette is reduced to, so PNG output here is not a lossless copy of the original pixels.
WebP is the sensible default for anything going on a web page. On a detailed test photo at 1200×800 and the default quality we measured JPEG at 236 KB, WebP at 273 KB, AVIF at 347 KB, TIFF at 270 KB, PNG at 785 KB and GIF at 983 KB — so on this photographic test the two to pick between are JPEG and WebP, while PNG and GIF were several times larger without a visible quality advantage. For screenshots, flat graphics or transparency, PNG can be the better choice. On quality, 82 is a good balance: dropping to 70 saved about a quarter of the bytes on JPEG and a little under a third on WebP, while pushing to 95 roughly doubled both for a difference you would struggle to see. Two things to watch. PNG output is reduced to a palette of at most 256 colours, which is invisible on flat artwork but can band a photograph or a gradient, and there is no setting that turns the palette off. And an animated GIF comes back as a single still frame: the resize reads the first frame only, so use the original file if the animation matters.
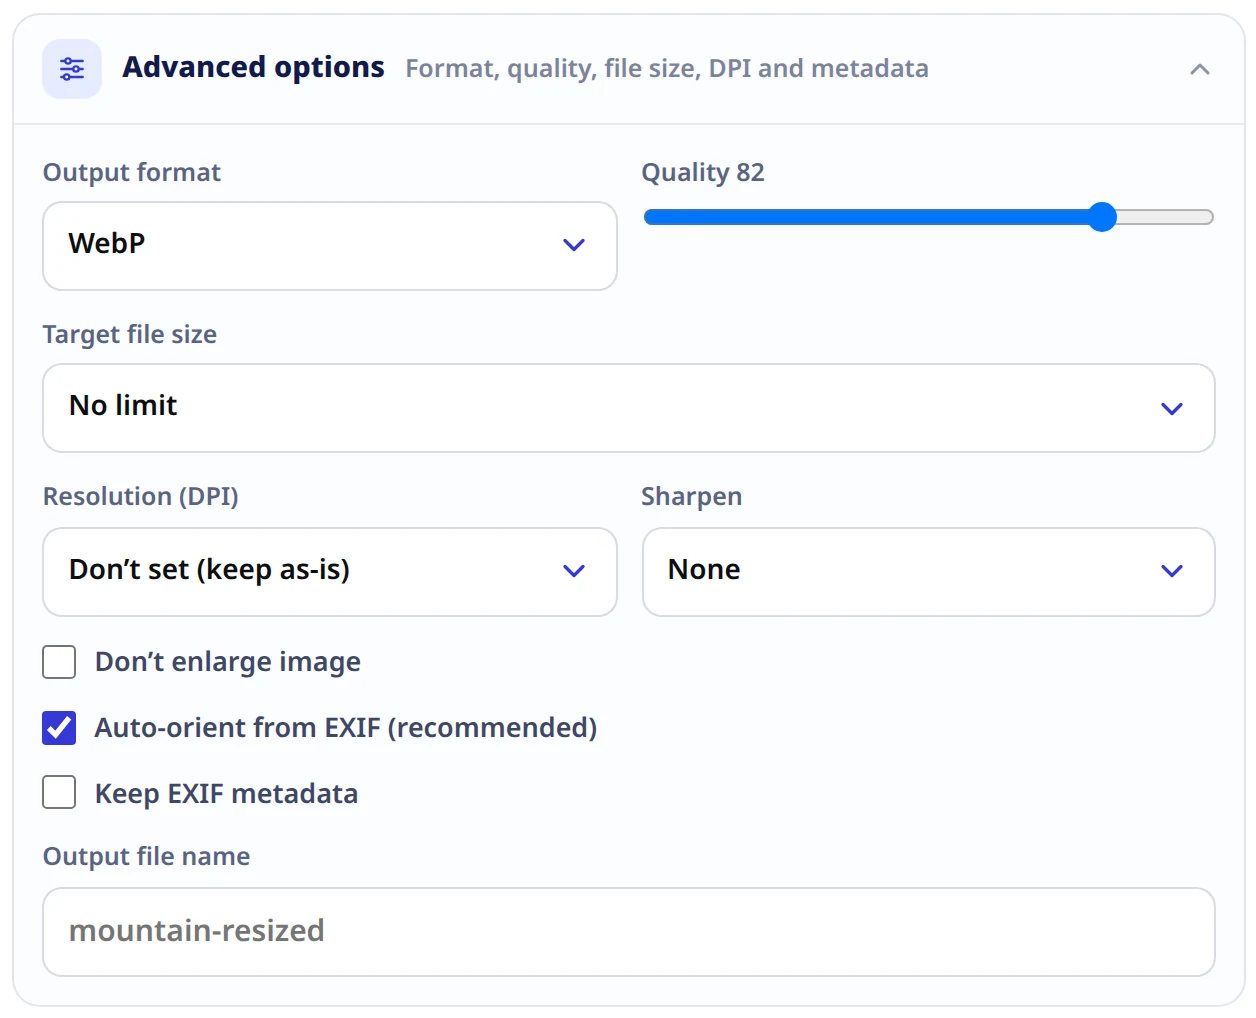
Advanced: file size, DPI, sharpening and metadata
The rest of what happens to the file, folded away by default. Target file size names a maximum and lets the tool search for the quality that lands under it. Resolution writes a DPI figure into the file. Sharpen adds low, medium or high sharpening after the resize. Don’t enlarge image stops the tool scaling anything up. Auto-orient reads the rotation tag phones write and turns the picture upright, and is on by default. Keep EXIF metadata retains the camera, date and location information that is otherwise removed. Output file name sets what the download is called.
Target file size is exactly right when a form says "maximum 500 KB". It applies to JPEG, WebP, AVIF and TIFF, so pairing it with PNG or GIF does nothing, and it can only go as small as the lowest quality allows: on a detailed 1200×800 photo we asked for 500, 200, 100 and 50 KB and every one of JPEG, WebP and AVIF landed under the figure; at 20 KB, JPEG came back at 19 KB and AVIF at 18 KB, but WebP could not get below about 31 KB even at quality 1. Bring the pixel dimensions down as well if a target is that tight. Don’t enlarge is worth ticking when you are working through images of different sizes — we asked for 5000×3333 from a 3000×2000 photo and it came back at its original size rather than being blown up, and it clamps each side on its own, so 5000×1500 from that photo came back 3000×1500. DPI is metadata only and changes nothing on screen; set 300 when a printer asks for it, and note that choosing a DPI causes the original metadata to be written back out too, so the file keeps its camera and location tags even with Keep EXIF metadata unticked. A touch of sharpening helps when you have scaled a photo well down; skip it on graphics and screenshots, where it makes edges look brittle. Leave auto-orient on — with it off, a photo carrying the sideways rotation tag stays sideways. Leave metadata off unless you need it: the default strips your camera model and GPS position from anything you share. And a file name is worth setting when you are producing several sizes of the same picture — hero-1200x800 saves working out later which file is which.
Why use Pixpoo for Resize?
- Three ways to ask for a size: exact pixels, a ready-made preset, or a percentage of the original.
- Fit within scales a picture down to sit inside a box you name, keeping its proportions.
- Ready-made sizes for HD, Full HD, 4K, square social posts, a Facebook cover, a Twitter post and a thumbnail.
- Six output formats, so you can choose the best balance of size, quality and compatibility.
- A target file size that finds the quality for you when an upload form has a byte limit.
- Phone photos are turned upright automatically, and camera metadata is removed unless you ask to keep it.
Resize features
Resize limitations
The honest boundaries are mostly about what resizing can and cannot do. Enlarging cannot invent detail — asking for more pixels than the original has gives you a softer version of the same picture, which is what the upscaler exists for. Uploads are capped at 25 MB. HEIC photos, the default on recent iPhones, cannot be read: set the camera to "Most Compatible" or convert to JPEG first, and the tool will tell you if you hit this. The target file size applies to JPEG, WebP, AVIF and TIFF and cannot beat what the lowest quality setting produces, so a very small target on a large photo needs smaller dimensions too. Animated GIFs are read as a single frame, so the animation does not survive a resize. Images are handled one at a time rather than as a batch. The DPI setting is metadata and changes nothing you can see on screen — and, as noted above, using it keeps the rest of the file’s metadata as well. Finally, unlike the PDF toolkit, this tool uploads: the image goes to Pixpoo’s server, is processed in memory and is never written to disk or stored, but it does leave your machine.
Common Resize questions
How do I resize an image without losing quality?
Scaling down is the safe direction — you are discarding pixels you no longer need, and the result stays sharp. Keep the aspect ratio locked so nothing stretches, choose WebP or JPEG, and leave quality around the default of 82; on our test photo, dropping to 70 saved about a quarter of the file size on JPEG and a little under a third on WebP, while 95 roughly doubled both for no visible gain. A little sharpening helps if you have scaled down a long way. Enlarging is the direction that costs quality, because the extra pixels have to be invented.
What is the difference between the four resize modes?
By dimensions and Exact size both target the width and height you type; the difference is that By dimensions keeps the aspect ratio locked so the numbers stay in proportion, while Exact size forces them and will stretch the picture. By percentage scales the original by a factor, which is the quickest way to say "half the size". Fit within treats the numbers as a maximum, so a landscape photo dropped into a square box is scaled until its long side fits and keeps its proportions, where the other two modes square it off and stretch it.
Which format should I choose?
For photographs on a web page, WebP or JPEG. We measured the same 1200×800 photo at 236 KB as JPEG and 273 KB as WebP, against 785 KB as PNG and 983 KB as GIF. On a photograph those last two buy you nothing you can see for several times the bytes; where they earn their place is screenshots, flat graphics and anything that needs a transparent background. If you do pick PNG, note that this tool writes a palettised file — 256 colours at most — so a logo or a screenshot comes out exactly as you would expect, while a photograph or a long gradient can pick up faint banding. AVIF compresses very well on simple images but was larger than both JPEG and WebP on our detailed test photo, so it is worth comparing rather than assuming.
How do I get an image under a specific file size?
Use the Target file size option rather than nudging the quality slider. Pick "Under 500 KB", "Under 1 MB" or a custom figure and the tool tries a series of quality settings and returns the best one that fits. It applies to JPEG, WebP, AVIF and TIFF — pairing it with PNG or GIF has no effect — and it cannot go below what the lowest quality setting produces. On a detailed 1200×800 photo, targets of 500, 200, 100 and 50 KB were all met by JPEG, WebP and AVIF. Push further and the search runs out of room: ask for 20 KB and JPEG returns about 19 KB and AVIF about 18 KB, while WebP will not go under roughly 31 KB however far the quality drops. Below that, the fix is fewer pixels rather than less quality.
Will my photos come out sideways?
No. Phones record which way up the camera was held as a tag rather than rotating the pixels, which is why photos sometimes appear sideways in other software. Auto-orient is on by default: we tested an image carrying that tag and the pixels were physically turned upright before the resize, so the width and height you ask for apply to the picture the right way round. You can turn it off in the advanced options if you have a reason to.
Does resizing remove my photo’s location data?
Yes, by default. Camera make and model, the date and any GPS position are stripped unless you tick "Keep EXIF metadata". There is one exception worth knowing: choosing a Resolution (DPI) other than the default causes the original metadata to be written back into the file as well, even with that box unticked. So if removing location data is the priority, leave the DPI setting alone.
Can I make a small image bigger?
You can, but it will not add detail. Asking for more pixels than the original contains produces a larger, softer copy — the tool has nothing extra to draw with. Tick "Don’t enlarge image" if you want to be sure nothing is ever scaled up: we asked for 5000×3333 from a 3000×2000 photo with the box ticked and it came back unchanged at 3000×2000. If you need a genuinely larger file, the upscaler enlarges with a sharper resampling method than a plain resize uses — though it cannot invent detail either.
What is the largest image I can resize?
Uploads are capped at 25 MB, and each side of the output at 8000 pixels. That is comfortably above a full-frame camera file at normal settings. If a photo is over the upload limit, exporting it at a slightly lower quality from your camera software first is usually enough. HEIC files, which recent iPhones produce by default, cannot be read at all — switch the camera to "Most Compatible" or convert to JPEG first.
Does it work on a phone?
Yes. The tool runs in any modern browser on Android and iOS with nothing to install, and you can resize an image straight from your camera roll.
Is the Resize tool free?
Yes. Resize with Pixpoo is completely free — no sign-up, no watermark and no usage limits on the free tier.
Are my images uploaded to a server?
Yes. Image Toolkit operations upload the selected image to our server for processing. The file is held temporarily in memory, used only to perform the requested operation, and then discarded. Images are not permanently stored, never written to disk and never shared. Our PDF tools work differently: those run entirely in your browser and upload nothing, so a PDF stays on your device throughout.
Related image tools
Crop · Compress · Convert · Upscale · All image tools